how to add us holidays to outlook calendar
Related Articles: how to add us holidays to outlook calendar
Introduction
In this auspicious occasion, we are delighted to delve into the intriguing topic related to how to add us holidays to outlook calendar. Let’s weave interesting information and offer fresh perspectives to the readers.
Table of Content
- 1 Related Articles: how to add us holidays to outlook calendar
- 2 Introduction
- 3 Staying Organized and Informed: Adding U.S. Holidays to Your Outlook Calendar
- 3.1 The Importance of Incorporating U.S. Holidays
- 3.2 Adding U.S. Holidays to Outlook: A Step-by-Step Guide
- 3.3 FAQs: Addressing Common Queries
- 3.4 Tips for Effective Calendar Management
- 3.5 Conclusion
- 4 Closure
Staying Organized and Informed: Adding U.S. Holidays to Your Outlook Calendar
In the bustling world of modern work, staying organized and informed is paramount. One crucial element of this is maintaining a well-structured calendar, particularly when it comes to recognizing important dates like national holidays. Integrating U.S. holidays into your Outlook calendar offers numerous benefits, enhancing productivity and ensuring you’re never caught off guard by a surprise day off.
The Importance of Incorporating U.S. Holidays
Adding U.S. holidays to your Outlook calendar is not merely a matter of aesthetic appeal; it holds practical and strategic value. Consider these key benefits:
- Enhanced Time Management: By visually representing holidays, you gain a comprehensive view of your schedule, allowing for better planning and allocation of time. This prevents scheduling conflicts and ensures that you’re prepared for any potential disruptions.
- Improved Communication: Knowing when holidays fall helps you communicate more effectively with colleagues, clients, and other stakeholders. This ensures that you’re aware of any potential scheduling changes or adjustments that might arise.
- Increased Productivity: A well-organized calendar reduces mental clutter, minimizing distractions and allowing you to focus on your tasks with greater clarity and efficiency.
- Reduced Stress: Knowing when holidays fall can help alleviate stress, as it allows for proper planning and preparation. You’ll be less likely to feel overwhelmed or unprepared when a holiday approaches.
- Enhanced Personal Life Integration: Holidays often involve personal events and commitments. Integrating them into your Outlook calendar ensures that you’re aware of these events and can plan accordingly, seamlessly blending work and personal life.
Adding U.S. Holidays to Outlook: A Step-by-Step Guide
The process of adding U.S. holidays to your Outlook calendar is straightforward and can be achieved through several methods. Here’s a comprehensive guide:
Method 1: Utilizing the Built-in Calendar Feature
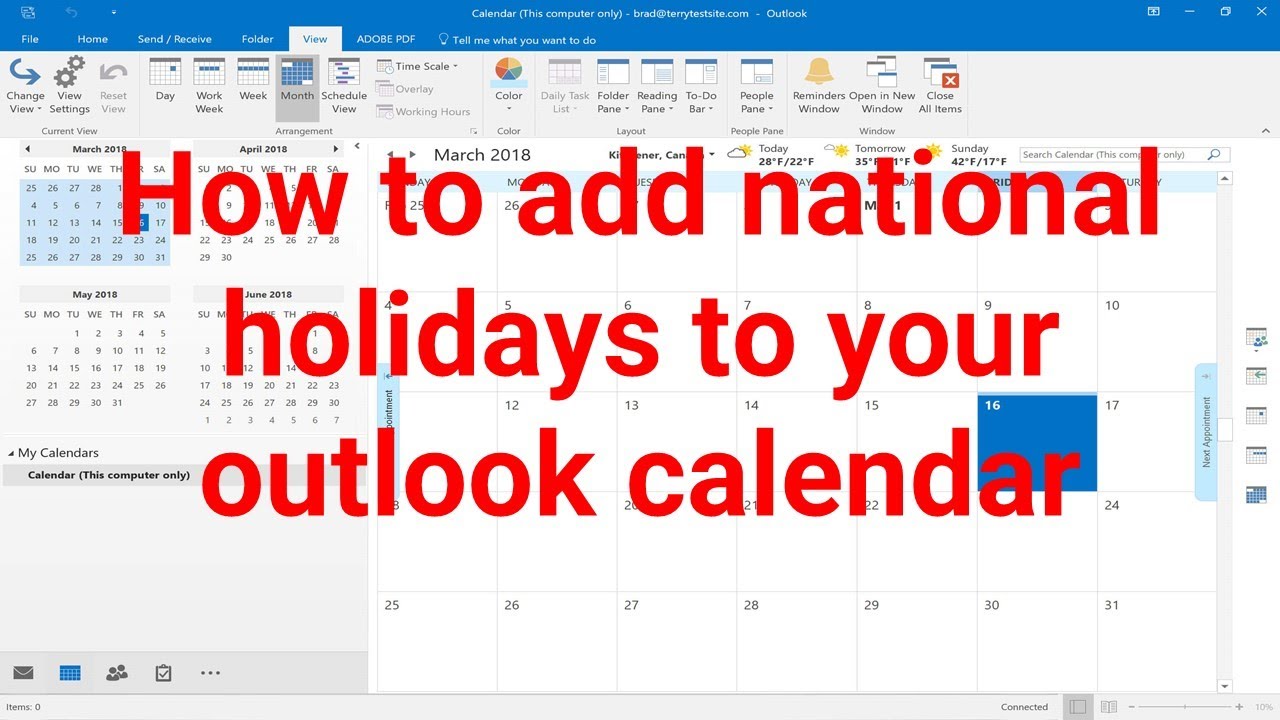
- Open Outlook: Launch your Outlook application.
- Navigate to Calendar: Click on the "Calendar" icon in the navigation pane.
- Access Calendar Settings: Click on the "File" tab in the top left corner.
- Select Options: Choose "Options" from the dropdown menu.
- Open Calendar Options: In the "Outlook Options" window, select "Calendar" from the left-hand menu.
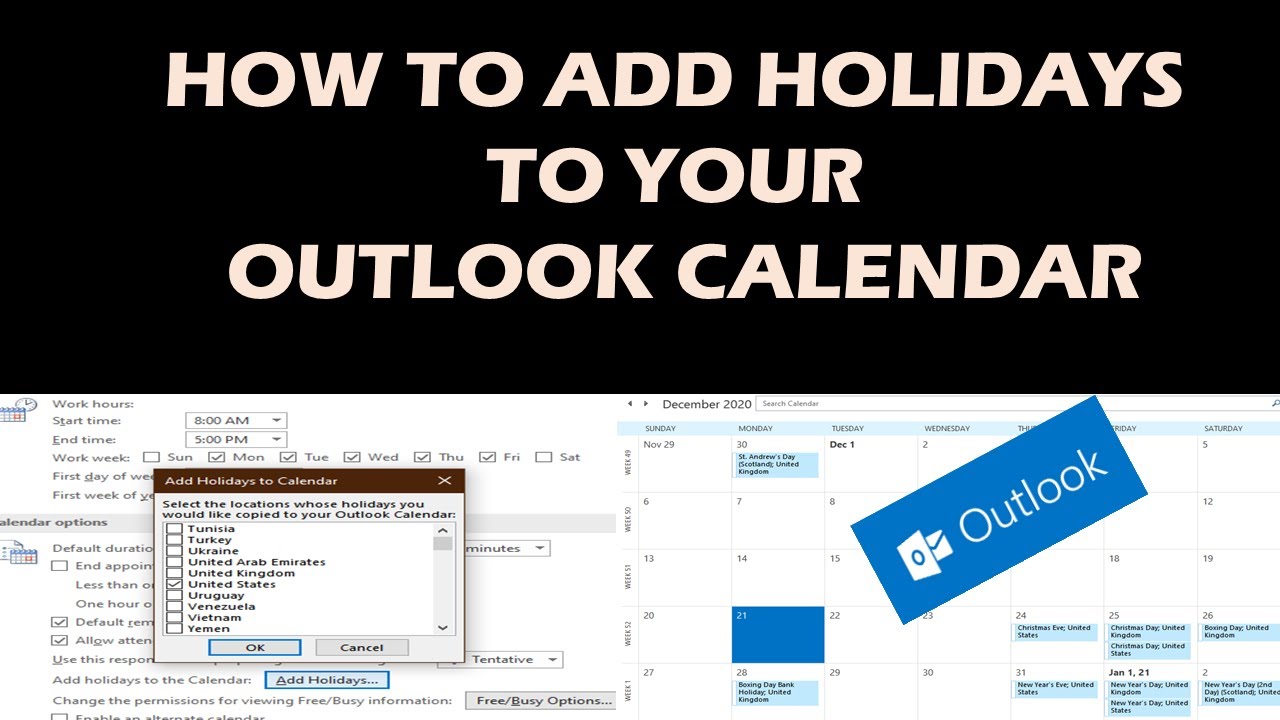
- Locate Calendar Options: Scroll down to the "Add holidays" section.
- Choose Holiday Region: Click on the "Add holidays" button and select "United States" from the dropdown menu.
- Confirm and Apply: Click "OK" to confirm your selection and close the "Outlook Options" window.
Method 2: Importing an ICS File
- Find the ICS File: Search online for "U.S. holidays ICS file" and download the file to your computer.
- Open Outlook Calendar: Access your Outlook calendar as described in Method 1.
- Import the File: Click on the "File" tab, select "Open & Export," and then choose "Import/Export."
- Select Import: In the "Import and Export Wizard," choose "Import from another calendar" and click "Next."
- Choose ICS File: Select "Import from an iCalendar (.ics) or vCalendar (.vcs) file" and click "Next."
- Browse and Select: Browse your computer to locate the downloaded ICS file and click "Next."
- Confirm Import: Review the options and click "Finish" to import the holidays into your calendar.
Method 3: Manually Adding Holidays
- Open Outlook Calendar: Access your Outlook calendar as described in Method 1.
- Create New Event: Click on the "New Appointment" button or use the keyboard shortcut "Ctrl+Shift+A."
- Enter Holiday Details: In the appointment window, enter the holiday name, date, and any relevant details.
- Set Recurrence: If the holiday occurs annually, set the recurrence option to "Yearly" and specify the date.
- Save the Event: Click "Save & Close" to add the holiday to your calendar.
Important Note: For the most accurate and up-to-date holiday information, it is recommended to utilize the built-in calendar feature or import an ICS file from a reputable source.
FAQs: Addressing Common Queries
Q: Can I customize the holiday names and descriptions?
A: Yes, you can customize the holiday names and descriptions after importing or adding them to your calendar. Simply double-click on the holiday event to open the appointment window and edit the details as desired.
Q: How can I ensure that I receive notifications for upcoming holidays?
A: To receive notifications, navigate to the holiday event in your calendar and click on the "Reminder" option. You can then set a reminder time or choose to receive a notification a certain number of days before the holiday.
Q: Can I share my calendar with others, including holidays?
A: Yes, you can share your calendar with others, including holidays. To do so, right-click on your calendar in the navigation pane, select "Sharing Permissions," and then add the desired recipients and specify the level of access they should have.
Q: What if I need to add holidays for a specific region within the U.S.?
A: While the built-in feature typically includes holidays for the entire U.S., you can find ICS files specifically for individual states or regions online. You can then import these files into your calendar using the method described above.
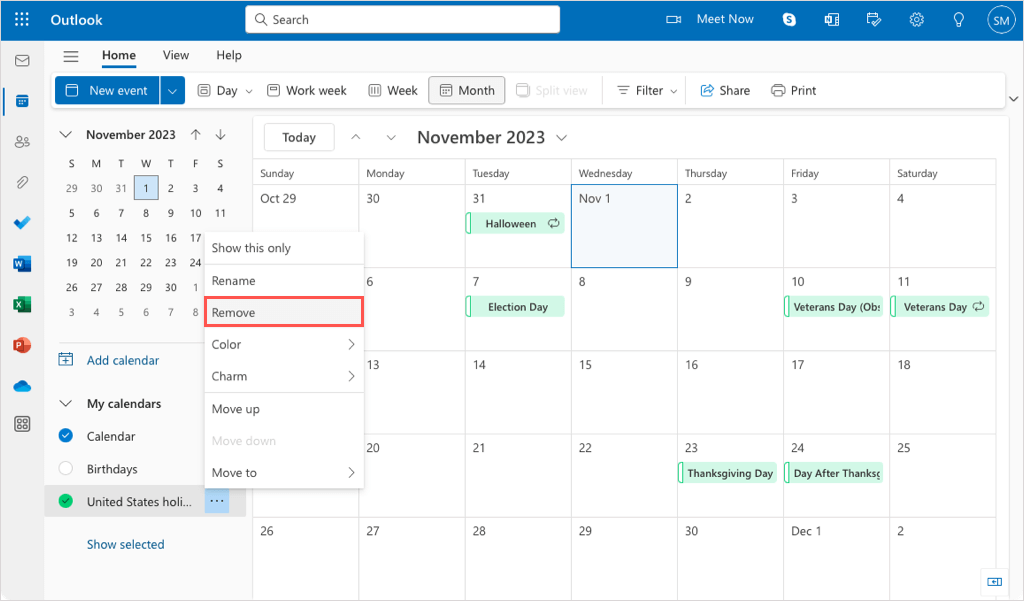
Q: Can I remove holidays from my calendar?
A: Yes, you can remove holidays from your calendar by simply deleting the corresponding events. To delete an event, right-click on it and select "Delete."
Q: Are there any other ways to add holidays to my Outlook calendar?
A: While the methods mentioned above are the most common and straightforward, you can also explore third-party applications or online tools that offer holiday calendar integration with Outlook.
Tips for Effective Calendar Management
- Color-Coding: Use different colors to categorize holidays, appointments, and other calendar events, enhancing visual clarity and organization.
- Custom Categories: Create custom categories for different types of events, such as "Work," "Personal," or "Holidays," to further segment your calendar and facilitate quick navigation.
- Regular Review: Make a habit of reviewing your calendar periodically to ensure accuracy and identify any potential conflicts or overlaps.
- Share with Colleagues: Share your calendar with colleagues for improved communication and coordination, particularly when it comes to shared projects or deadlines.
- Utilize Reminders: Set reminders for important events, including holidays, to avoid missing deadlines or important occasions.
Conclusion
Adding U.S. holidays to your Outlook calendar is a simple yet effective practice that significantly enhances your time management, communication, and overall productivity. By incorporating holidays into your schedule, you gain a comprehensive overview of important dates, reducing stress and ensuring that you’re always prepared for any potential disruptions. Take advantage of the various methods available and customize your calendar to suit your specific needs, creating a powerful tool for navigating the complexities of modern work life.

![How To Add US Holidays To Outlook Calendar [Easy Guide 2024]](https://10pcg.com/wp-content/uploads/outlook-calendar.jpeg)
![How To Add US Holidays To Outlook Calendar [Easy Guide 2024]](https://10pcg.com/wp-content/uploads/how-to-add-us-holidays-to-outlook-calendar.jpg)

Closure
Thus, we hope this article has provided valuable insights into how to add us holidays to outlook calendar. We hope you find this article informative and beneficial. See you in our next article!